Wednesday 24 January 2018

My favorite websites and blogs related to networking and NS2 are here ...

NS2 related links and blogs

By IIT Kharagpur
http://iitkgp.vlab.co.in/index.php?sub=38&brch=121

 BY Emory College of Arts and Science
http://www.mathcs.emory.edu/~cheung/Courses/558-old/Syllabus/90-NS/


By Worcester Polytechnic Institute
http://nile.wpi.edu/NS/


Tcl and OTcl related links
https://wiki.tcl.tk/


Monday 22 January 2018

Installing ns-allinone-2.35 on ubuntu 16.04 (32 bit) and Uninstalling


  1.  Download the ns version of your choice (here I am using ns-allinone-2.35 for Ubuntu 16.04) and un-tar your folder (check online on how to un-tar your folder).
  2. Open the terminal using the key combination 'alt+ctrl+t' and issue the following command(s)
    1. sudo su (press enter)
    2. Now give the system password
    3. Ensure that a # symbol is shown at the end of the path name.
  3.  Now issue the command(s) one by one
          sudo apt-get update
        sudo apt-get install build-essential autoconf automake
        sudo apt-get install tcl8.5-dev tk8.5-dev
        sudo apt-get install perl xgraph libxt-dev libx11-dev libxmu-dev

    4. Extract and install ns2
        
After extracting the "ns-allinone-2.35" folder, open up the file "/ns-allinone-2.35/ns-2.35/linkstate/ls.h" in an editor. We have to make some changes in the ls.h file else it will show an error while installing the NS. After opening the file, move to the line number 137 and replace the erase (image 1) with this->erase (image 2) and save the file.                  
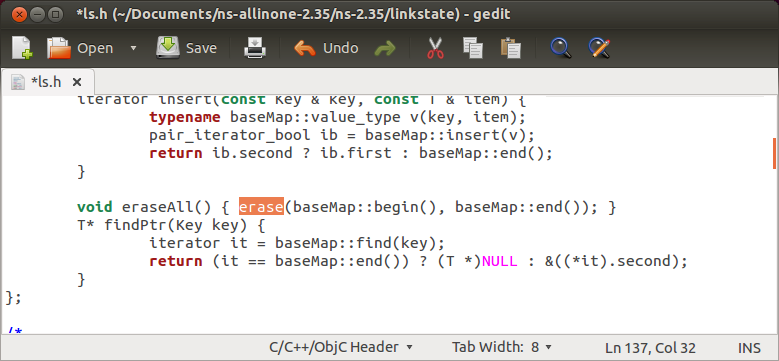
                                                                                                                           Image 1


                                                      Image 2

     5. Now go to the folder where ns-allinone folder is present and then issue the command ./install (on my machine the path to the folder is /home/ccnlab/ccnlab/ns-allinone-2.35) . Here the first 'ccnlab' is name of the machine and the second 'ccnlab' is the name of the folder where ns-allinone-2.35 is present.                                                     
     If ns2 installation is successful, then edit the bashrc file as follows: Issue the command gedit ~/.bashrc in the terminal and enter the following code.  
-----------------------------------------------------------------------------------------------------------
# LD_LIBRARY_PATH
    OTCL_LIB=/home/ccnlab/ccnlab/ns-allinone-2.35/otcl-1.14/
    NS2_LIB=/home/ccnlab/ccnlab/ns-allinone-2.35/lib/
    USR_Local_LIB=/usr/local/lib/
    export LD_LIBRARY_PATH=$LD_LIBRARY_PATH:$OTCL_LIB:$NS2_LIB:$USR_Local_LIB

# TCL_LIBRARY
    TCL_LIB=/home/ccnlab/ccnlab/ns-allinone-2.35/tcl8.5.10/library/
    USR_LIB=/usr/lib/
    export TCL_LIBRARY=$TCL_LIBRARY:$TCL_LIB:$USR_LIB

 # PATH
    XGRAPH=/home/ccnlab/ccnlab/ns-allinone-2.35/xgraph-12.2/:/home/ccnlab/ccnlab/ns-allinone-2.35/bin/:/home/ccnlab/ccnlab/ns-allinone-2.35/tcl8.5.10/unix/:/home/ccnlab/ccnlab/ns-allinone-2.35/tk8.5.10/unix/

NS=/home/ccnlab/ccnlab/ns-allinone-2.35/ns-2.35/

NAM=/home/ccnlab/ccnlab/ns-allinone-2.35/nam-1.15/

export PATH=$PATH:$XGRAPH:$NS:$NAM
-------------------------------------------------------------------------------------------------------
    In the above file the text "home/ccnlab/ccnlab" must be replaced with appropriate path where the ns-allinone-2/35 folder is present. Now save the file and close it.

    6. Now issue the command source ~/.bashrc
    7. Now type ns (if you get a % symbol, then you are successful in installing ns2 else tyr installing it using the command sudo apt-get install ns2)
    8. Now type nam (if you get a new animation window then you are done!. If you get any error such as, say for isntance, segment fault core dump, then follow the link here)

Note: If any of your folders are locked (you can see the keypad) then unlock them using the command chmod -R 777 *

Un-installation step(s):

To uninstall ns2, type the following command at the command prompt in the terminal
 sudo apt-get remove ns2


Tuesday 3 January 2017

Integrating mannasim into ns-allinone-2.35 on ubuntu 14.04 (64 bit OS)

You can follow the steps given here

https://github.com/paultsr/ns-allinone-2.35


In case you face problems while downloading from git hub then do the following:

1) Open the terminal (ALT+CTRL)
2) Goto to 'home' directory by issuing the command "cd .."
3) Ensure that you are in home directory
4) Issue the command " gedit /etc/hosts " and enter the following details into this file:

192.30.253.112:443  github.com
192.30.253.113:443  github.com
192.30.252.129 github.com
192.30.252.131 github.com
204.13.251.16 github.com

once done, save the file and close it

5) Now run the command " sudo git clone git://github.com/paultsr/ns-allinone-2.35.git " in the terminal

6) After a while, depending on the Internet speed and your system configuration, you must see a folder with the name ns-allinone-2.35 in home directory.

7) Now move this file into /usr/local. To do that issue the following command "mv ns-allinon-2.35 /usr/local " from the terminal (ensure that you are in the home directory where ns-allinone-2.35 is available (the one downloaded just now). 

8) Then issue the following two commands, one after the other, in the terminal 

                  a)      cd ns-allinone-2.35
                  b)      sudo ./install

9) Once the installation is successful ( ensure that there are no errors ) then you must find a folder named ns2 in /home/user_name/ where "user_name" is the name of your computer.   In this folder you will find four tcl files, you can run them by issuing the command "ns filename.tcl" . If your instillation is successful, then a NAM file will be opened ... Success!!!

10) To test sensor network application programs download the files from http://www.mannasim.dcc.ufmg.br/download.htm
namely, mannasim-rede-hierarquica.tcl and mannasim-rede-plana.tcl and run them (indivudually) you must see the result.


 Link to ns-alinone-2.35, and two tcl files

https://drive.google.com/file/d/0B8H5o7XW3wzJN0RzS3RQVVdTSVE/view?usp=sharing


 mannasim-rede-hierarquica.tcl

mannasim-rede-plana.tcl  


For leach protocol testing, use the file from here

https://drive.google.com/file/d/0B7S255p3kFXNdlBfdjBMNjN6Nnc/view 

or from  here

 
https://drive.google.com/file/d/0B8H5o7XW3wzJWG51dFE1dGp4LU0/view?usp=sharing


Thursday 9 July 2015

NAM problem solved - ubuntu 14.04 (32 bit version.)


Go to this website:


 Download the package and unzip it. You will find two folders with the Downloaded package, unzip it. You will find two folders with the name "DEBIAN" and "usr".


In the "usr"  folder, you will find a "local" folder and within this you must find two more folders with the names "bin" and "lib", copy the contents of "bin" folder, which is "nam", into the /usr/local/bin folder on your machine and the contents of "lib" folder which is "nam-1.15" into /usr/local/lib.


Now, open a terminal with the command ctrl+alt+t, the terminal opens. Now issue the command

"sudo apt-get install nam" and now you run any tcl script you must be successful.


This worked for me and I am happily running NAM on Ubuntu 14.04 (32-bit).


For Ubuntu 14.04 (64-bit), download the file from

https://drive.google.com/file/d/0B8H5o7XW3wzJT0ZscU1IRFJQSk0/view?usp=sharing


Copy the contents of "nam_1.14_amd64" into the directory as mentioned for 32-bit versions. 
That is into /usr/local/lib
                                                                                                            ( courtesy: Nirav Toliya)

or you can try this...

sudo apt-get remove nam
sudo dpkg --install nam_1.15-10_i386.deb

Now type <nam>